Showing posts with label Chocolate. Show all posts

Sunday, 17 September 2017

Penguin Christmas: Completed


Oh, what a fun cake! This is for my co-worker and his wife for their family Christmas. I'm glad it's done, though ... I've been working on it for a week. It turned out even cuter than I planned.

Stats:
8" round
Duncan Hines Dark Chocolate Fudge cake mix
iced and filled with semi-sweet + milk chocolate ganache
covered in white MMF
a border with royal icing
fondant accents
This was my first chance to work with Satin Ice (brand of manufactured fondant). I ordered red, green, and black 2 lb. tubs from www.fondantsource.com. The price, including shipping, was the cheapest I could find. It shipped quickly and arrived on my doorstep last Thursday. I was so excited I started making the bodies for the penguins right away.


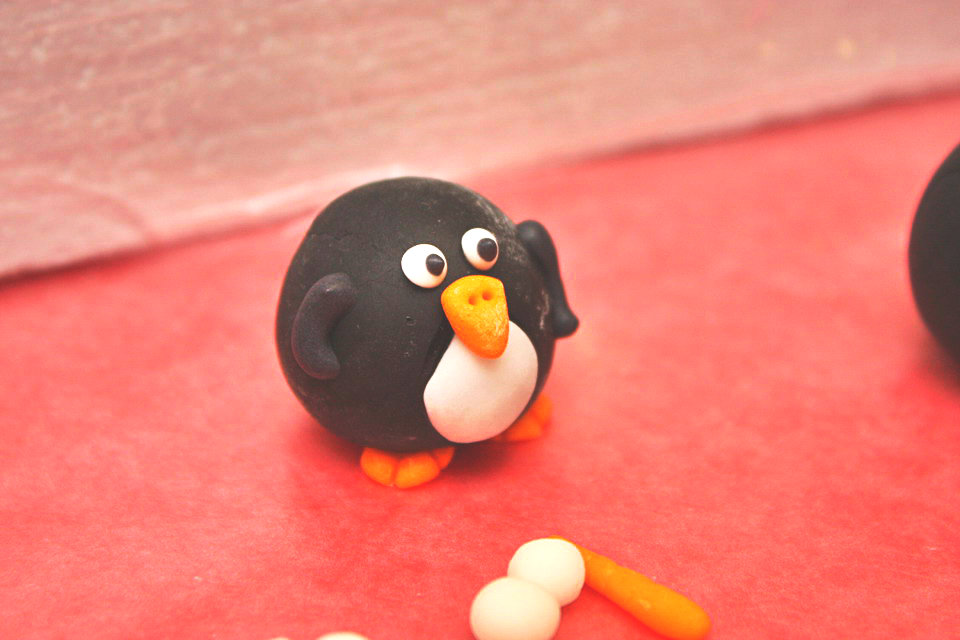
The entire body is fondant except for the eyes and arms. I was able to pipe on those using the royal icing I had made for decorating cookies. I made the creases for the toes with the edge of an old clay tool. The nostrils indentations were made with a toothpick. These little guys ring out with a personality that I didn't expect.


I also started the Christmas trees early. The large Christmas tree got scrapped because I ended up making it look ugly and figured it was too heavy for the cake anyway.


I used scissors to snipe the branches ... it looked much better when I watched Buddy do it on Cake Boss. Mine came out dry and rough looking. Oh well. I hope the decorations detract from that.


The cake baked up so nice ... this is the highest rising cake mix I've ever used. I tried making ganache with 12 oz of semi-sweet morsels plus a handful of milk chocolate morsels. When it came to icing the cake, I could see that the milk chocolate morsels didn't get incorporated into the rest of the chocolate. They were still soft and spreadable, but it looked like light brown splotches all over the cake. I let it chill in the fridge overnight to set. When I rolled the fondant onto it, I noticed the ganache might have been too hard. I could smooth out a lot of the roughness. You can see it along the edges in the picture below.


Otherwise, icing and covering the cake went really well. I'm really getting the hang of eye-balling how I need my stuff to be. I'm not even measuring the sugar when I make fondant or royal icing.


Typical bead border on the bottom. But the fun part was the top. All my little guys first got skewered with a toothpick. This cake was making a 3-hour car drive, and I wanted to make sure there were no casualties. Each got secured with some royal icing. You can see it peaking out underneath them.


My previous cake proved I could make an icy/drippy border, which was perfect! Again, using icing I had made for decorating my sugar cookies ...


This whole cake came together really well, and I was super-pleased. It feels pretty good to be proud of a cake. Oh and this was cool: I was worried about the cake for the 3-hour drive. I put it in a cake box with the top cut off (because the Christmas trees were too tall). Then I put that box into this little wooden crate that I took from work. The building management for our office had brought us a gift basket full of candy, nuts, etc. They came in this simple wooden box/crate things. The 10" cake box fit inside it PERFECTLY. The cake was now snug, safe, and very portable. I only have one more crate left ... I wonder if I can order them ...

FAILs:
I need to figure out how to mix semi-sweet and milk chocolate for ganache
set too hard ... or maybe that wouldn't have been a problem if I iced it smooth, to begin with
you know what? Satin Ice doesn't taste awesome all by itself ... it tastes chemical ... I may have to try coloring my own MMF with Americolor gel paste to get a rich red, green, or black without sacrificing taste ... I hope no one eats a penguin

FTWs: 
figures turned out super cute
Satin Ice fondant was very easy to work with
I really love that drippy snow border!!!
wooden crate held the cake box safe and snug
Merry Christmas, Hang, and Sandi!
Now for more pics!


source here

Friday, 1 September 2017

a green tea with strawberry and rhubarb, frankly delicious!


The first cheap strawberries are on the market, and I only think of one thing to strawberry, fast! And find greedy people to eat them !! This is my flagship cake, my favorite cake, I have made huge quantities of all shapes and ways! And here is the recipe!


Recall of ingredients:
5 eggs
250g Butter
470g Sugar
500g strawberries (a little more is even better)
125g Flour
500g (ml) Milk
50g Maïzena
Vanilla


Easy cake recipe:
3 eggs
100g caster sugar
100g of flour

1- Generously sprinkle a parchment paper (baking paper)
2- Preheat the oven to 200 ° C (Th 6/7)
3- Beat the white in snow at the robot (or at least with the electric mixer), and halfway pour the sugar and leave "meringuer"
4- Once the mixture is thick, put the yolks and the flour and mix with the manual whisk gently
5- Spread the dough on the sulphuret in thin layer (it will be necessary to cut 2 circles in it, or to cut it in 2 to make the 2 layers of strawberry cake)
6- Cook 10-12 min in oven (top must be lightly browned but not too much and edges must not be burnt)

Cream mousse (you can make a little more if you are greedy):
1/2 liter of milk
50g of Maïzena
2 eggs
250g butter at room temperature (released since the day before it is good)
120g caster sugar
vanilla extract or 1/2 vanilla pod or a whole clove

If you have a Thermo mix, put everything in the Thermo mix except the butter that you leave at room temperature, and it is left for 7 min 30/100 ° / vit. 4. Go back to point 6-
1- Mix eggs and sugar
2- Add the Maïzena and mix
3- Heat milk with vanilla
4- Pour the milk over the mixture eggs/sugar / Maïzena and mix
5- Return to the pan and cook by turning with the whisk without stopping until thickening and tasting to be sure that it does not have a mealy texture (it is not cooked in this case)
6- Out of the fire, incorporate 100g of butter and incorporate it into the whisk
7- Put to cool (you have to get an ambient temperature, you can go through the fridge but be careful that it does not become too cold)
8- Put the cooled cream in the bowl of the robot, and put little pieces of the butter (the 2 must be at the same temperature for it to work, it is very important)

If you have to do them by hand start by making a butter ointment and incorporate little by little the custard cream it will be simpler. Be careful not to be hot!

MOUNTING
1- Make a syrup at 30 ° B (188g of water 225g of sugar >>> boil 2 min and set aside)
2- Flavor cold syrup with kirsch, rum, orange blossom (whatever you want)
4- Wash and remove strawberries (about 500g or more!)
5- Cut the strawberries in half in the direction of the height and circle around a circle to entremets (circle inox of 4cm high) points up.


6- Place a disc of sponge cake at the bottom (cut it if necessary so that it comes in slightly forcing on the strawberries)
7- Soak it with syrup without exaggeration, but all the same, we must put a lot
8- Garnish with 1cm or 2 of cream
9- Distribute the strawberries by planting them in the cream, you must put a lot!
10- Cover with muslin cream (spread well between the strawberries)
11- Place a disc of sponge cake and soak it in the circle once, you can put back a layer of cream if you have any left because it is nicer afterward with the almond paste!


14- Spread almond paste (color of choice) to 2 / 3mm
15- Place the almond paste on the Strawberry and cut off at the edge of the circle.
16- Put in the refrigerator 4 to 6h (or prepare the day before it will be better!)


Wednesday, 30 August 2017

THE Royal Choco


If there was a chocolate cake to remember among those of pastry it is this one. When cut it first meets the foam ... the dacquoise hazelnut, re-foam, CROSSING PRALINATED !!!, and finally dacquoise nutty.
Balanced, light, delicious, it's one of my favorite cakes.
Not so difficult to do, it is enough to know the technique that I will try to detail as precisely as possible! For my part, I missed the foam the first time but by viewing a very accessible video I understood my mistake and I never missed it! So do not hesitate to do so by following the advice I will give you and the tour will be played!
Second strong point of this cake, one can easily make two and freeze the second for a future meal, it freezes very well, it is even a necessary step before the finishes!
Ingredients for a circle of 20cm: (personally I always do double the quantities to freeze one, because the robot prefers the large quantities and that the work is spread for 2 cakes)

Dacquoise:
- 100g of egg white (3-4)
- 30g of powdered sugar
- 70g icing sugar
- 60g of hazelnut powder
- 15g of cornstarch or flour
- a pinch of salt

Crusty praline:
- 35g of milk chocolate
- 140g of praline (you can do it yourself but in this case, I advise you to do this before)
- 60g of pancakes lace (glitter leaflet)

Chocolate mousse :
- 60g of yellows (4)
- 30g of sugar
- 25g of water
- 100g of chocolate pastry minimum 55% (me I put off the 64)
- 200g of liquid cream 30% minimum

Realizing the Hazel dacquoise:
Preheat your oven to 200-210 ° rotating heat.
In a salad bowl put the egg white, the powdered sugar, and the salt and whisk until you get a very solid meringue.
In a second bowl put the hazelnut powder, icing sugar and cornstarch and mix.
Incorporate the meringue gently.

Using a socket pocket, make a 20cm circle and a 18cm circle on parchment paper.

Tip: Butter your circle 20cm (and a 18cm if you have one) and to make the biscuit in, it will avoid that it falls down.

Bake 10-12 minutes at 200-210 ° turning heat, then place on rack. Be careful when you take off your biscuit not to break it.


Without circle
With circle, we see that it remains thick and fluffy

Put a bowl in which you will mount the Chantilly and the whisks in the fridge (or better to freeze) time to make the sequel.

Crusty praline:

Put the milk chocolate to melt in the microwave (be careful not to cook it). Add praline and heat if necessary (if not liquid enough).
Coarsely stir the lace crêpes in a bowl and then add them to the chocolate mixture praliné delicately.


Unmould your dacquoise if necessary and prepare your circle for the assembly (if you have rhodoid for example)

Spread the crisp on the 20cm dacquoise as long as it is warm.
I use a tablespoon, really I did not find better to spread out, it's great!

Chocolate mousse :

This is the most delicate step because there is the bomb paste, the whipped cream, and the chocolate, but I will guide you !!

Start by preparing your whipped cream. Remove the salad bowl from the fridge or frozen, put the cream in it, and whisk either with the robot (but beware of the small quantities) or with the electric mixer (attention splashes). When she is ready, she is said to be a bird's beak. When the beaters are removed, Chantilly hangs whips, like a beak. Reserve in the cool.
Be careful, if you whip too much, the cream turns into butter and if it is not enough you will not have a foam. I do as for the whites in the snow if I'm not sure I lean the bowl to see if it slips or if it sticks to the bottom (if it's glued it's good!)

Then melt the chocolate in the microwave. That is to say that you break it into small pieces then 1 min max power, you stir it a little, then in 30-second slices you check that it melts properly without baking by turning it until All is well melted.

The bomb dough!
Put the yolks in a salad bowl (or the robot bowl but watch out for small amounts) and prepare your drummer to go fast.
Put the water and sugar in a saucepan over high heat, when it boils and the sugar is completely melted, pour over the yolks whipping, then continue to whisk until chilled. It will whiten, thicken, lather!
In fact, it is said that whipping to the ribbon when you stop whipping, the dough must flow like a ribbon, it is sparkling and flowing.

Now you have to incorporate the melted chocolate with the bomb paste, attention is the decisive moment when everything is played (big pressure !!!).
With a spatula, drain all the chocolate into the bomb paste and mix thoroughly by remaining in the center of the bowl until you get a dinette-like or mont-blanc cream-like texture. Do not be delicate, do not do it with the whip anyway but it is essential that the mixture is done well otherwise the chocolate crystallizes and it is damn! When you feel that the mixture is working, you can calm the game and go more gently.

Finally, carefully incorporate the whipped cream, there must be delicate, and well go back to the bottom to bomb paste. Is it a little liquid? It's not too serious.

Mounting!

Pour some foam on your crispy about 1cm thick, then put your dacquoise 18cm in the middle and cover with foam to the top of the circle.
It is finished, now it leaves to the freezer for at least 2-4 hours before the finishes (or you decide that you have done enough, and you will sprinkle it with cocoa that is all! In this case no need to pass it To the freezer!

For those who want to do the mirror frosting, it's here!

Ingredients frosting mirror: (you will get for 2 cakes and it will inevitably because it necessarily takes more to coat a cake)

- 80 g of water
- 240 g of sugar
- 80 g of cocoa powder (100% cocoa)
- 160 g liquid cream
- 5 sheets of gelatin

Put the gelatin sheets in a cold water bath to soften them.
Put the water and sugar to heat in a saucepan over high heat. Place the cocoa powder in a bowl.
When the sugar has boiled and is completely melted, pour a good half on the cocoa and stir. Add the remaining syrup while trying to avoid as much as possible the lumps but it's not simple.
Recycle your pan to heat the cream. When it no longer boils, squeeze the gelatine and put to melt in the cream by stirring to homogenize well.
Pour the cream over the mixture cocoa mix, then filter all in a Chinese or colander to remove any lumps.

Let cool, you can pour this mixture on your frozen cake when it will be at 30 ° to see 25 ° in no panic and no precipitation especially!


The pictures speak for themselves, you put your cake on a rack with a plate underneath and you pour the frosting, then either with a bent spatula or shaking it a little, you remove the excess glaze.


Finally the finishes, you can melt chocolate etc. whatever you want, the internet will be a source of inspiration for deco!

The cake is eaten after 3-4 hours in the refrigerator, it will be perfect!


Tuesday, 18 July 2017

Opera pistachio-chocolate

Opera pistachio-chocolate


Still pistachio, you say? Yes, but it is so good, especially associated with chocolate, association certainly classic, but delicious.
I propose you a kind of Opera revisited or the pistachio replaces the coffee:

A biscuit joconde and 2 ganaches mounted, one with chocolate, the other with pistachio.
And for the first time, I wanted to try the "socket at St Honored" for the decor.
The result (aesthetically speaking) pleases me enough but I will have to train again to make beautiful "laces" of ganache ...

Here's the recipe:

ingredients

The biscuit joconde
- 2 whole eggs + 3 white
- 65 g of almond powder
- 65 g icing sugar
- 25 g caster sugar
- 40 g of T45 flour
- 25 g butter


The ganache mounted pistachio
- 20 cl liquid cream with a minimum of 30% (about 190 g)
- 85 g white chocolate (ideally Valrhona, or white chocolate to bake)
- 30 g of pistachio paste
- one half gelatin sheet
- 80g of mascarpone


Chocolate ganache
- 110 g of dark chocolate 60% (ideally Valrhona) + 220 g of liquid cream
   At least 30%
- 110 g liquid cream with a minimum of 30%

Caramelized Pistachios
- 40 g of pistachios
- half a glass of water
- 50 g caster sugar

And also :
- A glass of water
- 3 sugars in pieces
- a few drops of almond extract


Production
The day before (or at least 4 hours before), the ganaches mounted
The ganache is a creamy cream that can replace the butter cream and was invented by the school of the great chocolate Valrhona. I discovered this recipe in this wonderful book about chocolate, for me a reference book.

Chocolate ganache
Chop the chocolate and melt in a bain-marie or microwave (500 W power, stirring occasionally).
In a saucepan, heat 110 g liquid cream until boiling. Pour a third of the mixture and mix with a soft spatula (enamelled) energetically making small circles to create a "core" elastic and shiny. Incorporate the second third in the same way, then the third third, using the same method.
Add 220 g of remaining cold cream, mix, mix with a dipping mixer to "perfect the emulsion".
Shoot "in contact" with (place as close to the preparation, a food film) and leave in the fridge for 4 hours minimum.


The ganache mounted pistachio
Put the gelatin in cold water. Boil the cream, add the gelatin softened and drained and pour over the white chocolate with the pistachio paste.
Mix until the mixture is homogeneous (there, add one to 2 drops of blue food coloring, no more, to make the preparation slightly greener, but it is not obligatory).
Mixer, switch to Chinese, film on contact and leave in the fridge for 4 hours minimum.


The biscuit joconde
Preheat your oven, rotating heat, to 220 ° C.
Melt your butter in a saucepan. Once melted, leave the pan out of the heat.
In your robot (or in a salad bowl), pour the 2 whole eggs, the almond powder and the icing sugar. Raise it with the whisk for a few minutes.

In another salad bowl, whisk the 3 egg whites into snow, adding grated sugar as you go until you get a "bird's beak" on the branches of the whip.
Incorporate with a maryse, a quarter of the whites in snow at the 1st preparation and then incorporate the flour, the remainder of the whites into snow and the melted butter.

Spread your preparation as finely as possible with a spatula, on 2 baking sheets covered with greaseproof paper. On the 2nd plate, make sure that your rectangle is half as large (to obtain in the end 3 rectangles of the same size). If you have too much dough, make 2 large rectangles but you will have excess dough left.

Bake for 7 to 9 minutes. Check the cooking, the biscuit must be just golden.
Take out the 2 plates and put "2 upside down" your 2 biscuits on grates and gently remove the parchment paper. Let cool.

Prepare a syrup by boiling the equivalent of a large glass of water with 3 sugars in a saucepan. When boiling, remove from heat and add a few drops of almond extract (not too ...) and stir quickly with a whisk.
Do not worry, it does not mix well because the almond extract is fat, but this emulsion will be enough to soak your cookie.

Cut your biscuit into 3 rectangles of equal size (as I wrote above, there will be leftover cookies ...). Lightly soak each cookie from your almond emulsion with a brush.
We take the ganaches not yet mounted in the fridge ...

1- Assemble the electric mixer at medium speed (not too fast anyway) the chocolate ganache which will rise like a whipped cream. It must be firm.
Spread with the spatula this first ganache mounted, as evenly as possible, on a first rectangle of soaked biscuit, keeping about a quarter for the decoration. Reserve the remaining chocolate ganache in the fridge.
Place a second rectangle of soaked biscuit on the chocolate ganache.

2- Add the mascarpone to your pistachio preparation. Climb with the electric mixer at medium speed the pistachio ganache which will rise like a whipped cream. It must also be firm.
Spread with the spatula this second ganache mounted, as uniformly as possible, keeping about a quarter for the decoration.


Lay the 3rd and last rectangle of biscuit i

Opera pistachio-chocolate

Saturday, 15 July 2017

This cake is composed of a rhubarb jelly

cake yummy

This cake is composed of a rhubarb jelly, three Joconde biscuits with pistachio, five layers of passion fruit mousse and a crispy praline and pistachio. As usual, I decided to complicate the recipe by making my pistachio paste, my praliné and my purée of rhubarb myself, but you can simplify everything by buying these products directly on the market. Try to choose quality products!

Homemade pistachio paste
125g of raw, unsalted and pruned pistachios
30g almond powder
62g of sugar
18g of water
3 drops of bitter almond extract
1 tbsp groundnut oil (or sunflower oil)

Roast the pistachios at 150 degrees for 15min. In a saucepan, pour water and sugar.
Sprinkle the pistachios. Boil the water and sugar until the temperature reaches 121 °. Add the pistachios and mix with a spatula. The pistachios will sand.
Add the almond powder and the bitter almond extract. The mixer in the bowl of a robot equipped with a knife. Proceed in several steps so as not to damage your mixer. Add the oil along the way.

House praliné
200g of hazelnuts from Piedmont
125g of sugar
35g of water
1/2 vanilla bean

Roast the hazelnuts 20min at 160 °. Mold the hazelnuts by shaking them in a dishcloth and then leave them to cool. In a saucepan, cook water, sugar, and vanilla at 121 °.

Remove the vanilla beans, remove from the heat and add the hazelnuts. Sand and put back on fire. Caramelize, stirring for 20min. Dispense on a Flexi pat and let cool. Crush with a rolling pin and mix to obtain a fine powder.
Continue to mix, in several times, so as to obtain a paste. Pour into an airtight can and refrigerate.

Rhubarb puree
1,2kg of rhubarb
120g of sugar
A small glass of water (to be adapted according to the desired acidity)

Wash, peel and cut rhubarb into 1-cm sections and put it in a bowl.
Sprinkle with sugar and let stand 20 min. In a small saucepan, pour the contents of the salad bowl, including what the rhubarb rejected. Sprinkle with the glass of water.
Cook over medium heat for 5 minutes, stirring then leave to cook for 30 min on low heat, stirring occasionally. Mixer using the dip mixer.

Rhubarb jelly
750g of rhubarb purée
50g of lemon juice
80g caster sugar
4g agar agar
10 g of gelatin (ie 5 sheets)
The tip of a red dye knife

Soak the gelatine in plenty of cold water. Mix the rhubarb, lemon, and sugar.
Add the dye. Put on fire and add agar. Boil, stirring vigorously. Add the drained gelatin.
Cast in a frame of the desired dimensions over a thickness of about 7mm. Block in the cold.


Crunchy praline
75g pistachio paste (home or trade)
175g almond praline
100g milk chocolate (Jivara for me) melted at 40 °
100g of roasted and finely chopped almonds
100g of finely chopped pistachios
40g of melted butter
Mix all the ingredients in order.

Note: I used a commercial pistachio paste before making the house version. You will notice the difference, there is no picture !!

Spread on a Silpat mat or on a sheet of cooking paper in a frame with the same dimensions as the rhubarb jelly (same thickness of 7mm). Block in the cold.

Joconde biscuit with pistachio
300g almond paste (homemade or commercial but in this case, opt for a dough with 50% fruit content)
75g of pistachio paste
100g whole eggs
160g of egg yolks
400g of egg whites
140g caster sugar
85g of melted butter

Mix the almond paste (if necessary relaxed before using the microwave) with the pistachio paste until homogenization. Add the eggs one by one, mixing between each addition. Add the yolks.

Place the whites in the mixer, gradually adding the sugar until the whisk forms a point in a bird's beak.
Gently mix the first part with the whites. Stir in melted butter.
Spread a part of the mixture on a Flexi pat. Bake at 160 ° for 17min turning the plate halfway through cooking. With these quantities, I could do 3 flexplates.


Passion Fruit Mousse
350g of passion purée
30g of lemon juice
200g of sugar
14 g of gelatin (7 sheets)
750g of the whole cream mounted to the mixer

Heat the passion purée, sugar, and lemon. Add the softened gelatin and cool to 30 °.
Assemble the cream and mix gently with a mash.
Mounting

200g White Chocolate Ivory from Valrhona
40g of grape seed oil
1 patterned transfer sheet
The initial recipe provided for a jelly of passion and preserved rhubarb. But I decided to bring my little personal touch by replacing this top part of the cake with a fancy white chocolate shell made with a patterned guitar sheet. Do as you want, but be careful if you opt as I do for chocolate, it tends to slide over the passion foam.

cake yummy

Chocolate Eclairs


First of all, I wanted to tell you that I was sorry I did not give you much news in recent weeks.
I will try to be a little more regular in the future ...

And for our reunion, a classic recipe a priori simple, even if it requires a bit of technique if you want to get regular lighting with a nice frosting.

The little more of this recipe, in my opinion, is that I have not garnished the flashes of traditional pastry cream but a creamy chocolate, found in the book: The encyclopedia of chocolate, made by the school The great chocolate Valhrona. A recipe more creamy and less pasty in the mouth and more chocolate, in short, a delight ...

Here's the recipe:

Ingredients (for about a dozen lightning)
Choux pastry:
- 130 g of water
- 130 g of semi-skimmed milk
- 130 g flour type 55
- 130 g of sweet butter
- 2 g of salt
- 5 g caster sugar
- 6 g of vanilla extract

Creamy Chocolate:
- 210 g of dark chocolate 60% (ideally Valrhona)
- 250 g whole milk
- 250 g liquid cream (30% minimum)
- 5 egg yolks
- 50 g caster sugar

Frosting glaze:
- Pastry maker
- Mineral water
- Unsweetened cocoa powder


Production:
The day before (or at least 3 hours before the rest of the recipe)
Creamy Chocolate
Chop your chocolate or cut it into small pieces. Book.
Heat the cream and milk in a saucepan. Mix the egg yolks and sugar in a bowl until the preparation whitens.
Pour the milk and cream mixture over it, then pour it back into the saucepan and mix over low heat until 84 ° C, until the cream slick your wooden spoon.
Pour the chocolate, mix vigorously with a Maryse then pass a blow of mixer plunging.

Let cool, shoot the preparation on contact and reserve in the fridge for one night or 3 hours minimum.


The same day

The Choux Pastry


Preheat oven to 180 ° C.
In a saucepan bring to the boiling water, milk, sugar, salt, and butter.

Turn off the heat and add the flour all at once and mix very vigorously with a spatula.
Re-ignite the fire and continue to mix to "dry out" the dough it must be detached from the sides and bottom of the pan.

Put everything in the tank of a robot with the sheet and start beating at high speed.
Add the beaten eggs to an omelette, 3-4 times, making sure to beat well between each pouch so that the dough gets well.

If the paste is too dry add ½ egg, it is necessary that when passing a finger in the dough it closes on itself.


Put your preparation in a socket pocket with a plain socket (n ° 12) and set your flashes on a length of about 12 cm, directly on your plate previously buttered.

In the photos, you see that the lightning is laid on parchment paper and in fact, it is a mistake on my part. Meanwhile, a professional advised me to cook them directly on a buttered plate (not alveolate) so that the base of the lighting is flat.

Put your plate in the oven for about 40 min. When the flashes have already swollen (not before 20mn), you can open the door of your oven from time to time to let the moisture escape.
When they are golden brown, remove them from the oven and rinse them on a wire rack.


The lining

Take your creamy cream out of the fridge and mix it with your Maryse before filling a socket pocket with a narrow socket.

Turn over your flashes and with a thin knife made 3 holes along the length: 2 at the ends and one in the middle. Then fill each hole several times. After a while, you feel in your hand the lightning get heavier and fill up. In addition, the cream ends up coming out through another hole and so we know that the lightning is packed. Smooth with a flat knife.
The socket that I used is grooved but it worked well because the end piece is really narrow.


Frosting Glaze

Here is perhaps the most delicate part of the recipe ...

For the fondant, buy it in specialized stores or on the internet.
This is what it looks like:


I did not weigh the fondant. Put a sufficient quantity in a pan large enough to accommodate the entire length of a lightning bolt.
Heat gently in a bain-marie with water and unsweetened cocoa (enough to color the fondant well).
Normally the flux must not exceed 38 ° C if you want a beautiful glaze gloss. So if it is too dry, do not hesitate to add water to a semi-thick liquid consistency.

So soak the top of your flashes in the fondant then bend them and using your finger, smooth quickly to remove the excess flux and also smooth on the sides for nice finishes.

Here, the flashes are ready but will be better after 1 or 2 hours in the cool.


Enjoy your meal !!

Friday, 14 July 2017

Entremet Oreo Chocolate Peanut butter


Not a trip without taking advantage of it to taste all the possible specialties of the country. The United States has a terrible reputation for their gastronomy. There is some truth: they like to eat very sweet, very fat, very salty, and at all hours. But not only ! I was able to taste magnificent balanced and gourmet salty dishes, magnificent tarts, enormous, and delicious ... And the "healthy eating", there, is booming. Exit Fast Food, Bonjour restaurant chains offering soups and quiches with vegetables!
INGREDIENTS

For the base in Oreo:
  • 20 Oreos
  • 6 cl of melted butter
  • For thick chocolate mousse:
  • 450 grams of chocolate 66%
  • 1 teaspoon of vanilla extract
  • 2 x 240 ml of whole liquid cream
  • 2 eggs
  • 4 egg whites
For Chantilly with peanut butter:
  • 350 ml of whole liquid cream
  • 120 Ml peanut butter
  • For decadent decoration:
  • 60 grams of chocolate pastry
  • 1/2 teaspoon of vegetable oil
  • 3 Oreos crumbled

INSTRUCTIONS

  1. Start by preheating your oven to 170 ° C.
  2. Prepare a perfect 23 cm baking circle (or same-sized hinge pan, even better). Place on a baking sheet covered with parchment paper.
  3. For the base in Oreos: Melt the butter and mix it with the previously mixed Oreos.
  4. Spread this mixture at the bottom of the circle and 1 cm high on the sides.
  5. Bake 5 minutes in the oven.
  6. For Chocolate Mousse: Mix the chocolate finely in a robot.
  7. Add vanilla and half of the liquid cream (240 Ml) previously warmed to the microwave.
  8. Mix to obtain a smooth preparation.
  9. Transfer this mixture to a bowl and allow to cool to room temperature.
  10. When the preparation is at a good temperature, add the 2 eggs.
  11. Meanwhile, pour the remaining 240 Ml of liquid cream into whipped cream.
  12. In another container, put the 4 egg whites in the snow.
  13. Add the whites to the Chantilly.
  14. Then add this mixture eggs + Chantilly to the chocolate mixture (delicately!), Incorporating first 2 to 3 spoons to relax the chocolate preparation.
  15. You can then spread out your chocolate mousse on the Oreos base, and put it cool a few hours.
  16. For Chantilly with peanut butter: mix the liquid cream and the peanut butter. When the preparation is smooth, make a whipped cream.
  17. Spread your whipped cream with peanut butter on the chocolate mousse, and refrigerate.
  18. For decoration: Melt the chocolate in the microwave and add the oil. With a fork, draw strokes by swinging the fork back and forth. Add crumbled Oreos.
  19. Serve fresh and keep cool!