Monday, 4 December 2017

Princess Castle Cake

Princess Castle Cake


I really love making cakes (as if you had not already guessed!), but I have not made many themed celebration cakes. It is not because I do not have the ideas , I have plenty, it is just that I am no good with using fondant icing having not had any training or much practice, which is why I shy away from making elaborate character cakes. Therefore, when offering to make a special cake for someone’s birthday, I attempt my own style and prefer to use lots of frosting and sweets – afterall sweets can cover up many cake making mishaps!
Last month, a friend of Burton’s celebrated her 4th birthday and wanted a princess castle cake and wanting more practice at making celebration cakes I asked her Mum if I could make it for her because she was going to get a professional to make her one. Now, don’t get me wrong I am NO cake making professional but I am cheaper and full of enthusiasm so I won the ‘gig’ lol. I have a copy of  Birthday Cakes for kids by Anne Rigg                   which shows step by step instructions of how to make a castle cake , which I used as a guide. I used my own sponge recipe and made pink coloured sponges- perfect for any budding princess! The cake was constructed and covered in a white chocolate cream cheese frosting and then heavily laden with pretty chocolate sweets and I made turrets from ice cones covered in pink chcocolate, and for a finishing touch I added a princess crown for the birthday girl to remove and wear as she feasted on her cake.
Read More

Sunday, 3 December 2017

Top 10 Wild Animals of India

Top 10 Wild Animals of India

1. Bengal Tiger
Name – Panthera tigris tigris
Family – Felidae
Total Population – 2,226
Kingdom – Indian Subcontinent
Conservation Status – Endangered
Majestic-Tiger
The Bengal tiger is the second largest species of wild cat after the Siberian tiger and also the national animal of India. Panthera tigris tigris listed as endangered mammal and there are 3,890 individuals tigers life in the wild forest of India.

2. Indian Elephant

Name – Elephas maximus indicus
Family – Elephantidae
Total Population – 31,368
Kingdom – Mainland Asia
Conservation Status – Endangered
Elephant-Ride
Elephants are classified as megaherbivores and has been listed as endangered, threatened by habitat loss, degradation and fragmentation. The largest population of Asiatic Elephant are found in South India, inhabits grasslands, evergreen and semi-evergreen forests.

3. Indian Rhinoceros

Name – Rhinoceros unicornis
Family – Rhinocerotidae
Total Population – 3,555
Kingdom – Indian Subcontinent
Conservation Status – Vulnerable
Great-Indian-Rhino
Indian Rhinoceros are also called great Indian rhinoceros are native to the Indian subcontinent, primarily found in north-eastern states of India. Pobitora Wildlife Sanctuary and Kaziranga National Park shelters the highest density of Indian rhinos in the world.

4. Asiatic Lion

Name – Panthera leo persica
Family – Felidae
Total Population – 523
Kingdom – India
Conservation Status – Endangered
Asiatic_Lioness
Indian Lions are one of the five big cats found in India and one of the largest of Indian cat, lives as a single population in Gujarat. The habitat area of Asiatic lion is very small, they survives today only in the Gir National park of Gujarat and only about 411 lions are left in the wild forest of Junagarh.

5. Indian Leopard

Name – Panthera pardus fusca
Family – Felidae
Total Population – 14,000
Kingdom – Indian Subcontinent
Conservation Status – Vulnerable

Indian Leopards are known for their ability of climbing the tress and are powerful swimmers. The Leopards share habitat with other predators but they are also threatened by loss of habitat and fragmentation.

6. Sloth Bear

Name – Melursus ursinus
Family – Ursidae
Total Population – 20,000
Kingdom – Indian Subcontinent
Conservation Status – Vulnerable
Black-Bear
Indian sloth bears are one of the 4 species of wild bears found in India and distinguished from Asian black bears by their lankier builds. Sloth bears species are native to the Indian subcontinent and listed as vulnerable.

7. Wild Water Buffalo

Name – Bubalus arnee
Family – Bovidae
Total Population – 4,000
Kingdom – Indian Subcontinent
Conservation Status – Endangered
The wild water buffalo is the ancestor of the domestic water buffalo and the second largest wild bovid found in Assam. Wild water buffalo are endangered and live only in a small number of protected areas stretching across Nepal and Bhutan

8. Ghudkhur – Indian Wild Ass

Name – Equus hemionus khurFamily – EquidaeTotal Population – 4,800Kingdom – IndiaConservation Status – Near Threatened
Indian Wild Ass also called Khur are only found in the dry land of Little Rann of Kutch in Gujarat. The Indian Wild Ass Sanctuary  is home to  large number of  Indian wild ass and the population was estimated at 4,451 individuals.

9. Gaur – Indian Bison

Name – Bos gaurus
Family – Bovidae
Total Population – 22,000
Kingdom – India
Conservation Status – Vulnerable
Gaur-Nagarahole-National-Park
The Indian Bison commonly known as Gaur is the largest extant bovine and one of the most strong species of bovine, native to the Indian-Subcontinent.  The Gaur is the tallest of wild cattle species and has been listed as vulnerable.

10. Nilgai – Blue Bull

Name – Boselaphus tragocamelus
Family – Bovidae
Total Population – 1 million
Kingdom – Indian Subcontinent
Conservation Status – Least Concern
Giant-Blue-Bull
Nilgai or blue bull is the biggest Asian antelope and one of the most commonly seen species of wild animals in India. Nilgai is a diurnal creature found inhabiting Indian grasslands their range covers national park plains and low hills with shrubs of India.

Saturday, 2 December 2017

Freezer Friendly Breakfast Idea

Ingredients
  • 2 cups flour
  • 1 tbsp. baking powder
  • 1/2 tsp baking soda
  • 1/2 tsp salt
  • 2/3 cup milk
  • 2 eggs
  • 1 tbsp. vanilla
  • 1/3 cup maple syrup
  • 1/2 tbsp. oil
  • pinch of nutmeg (optional)
  •  
    Toppings:
  • berries
  • chocolate chips
  • almonds
  •  granol

  • Read More


    Wednesday, 29 November 2017

    Vietnam’s Mid-Autumn Moon Festival (Moon Cakes)

    Everyone gets one (or many) Bánh Trung Thu as gifts for the holiday. And so many are never unboxed. Instead, special friends pass them along as special holiday gifts to other special friends?

    Now, certainly many Vietnamese folk must love moon cakes – literally millions are sold each year in Vietnam as the mid-Autumn Festival arrives. But, I’ve never actually seen a Vietnamese friend go out and buy one to consume it for themselves. (I’ll await the onslaught of e-mails). And I’ve seen plenty of boxes of moon cakes sit untouched, week after week, on friends’ kitchen counters until, of course, I – a foreigner – arrive for a visit and am told, You must try a moon cake.
    Of course, I do. And certainly, I really have nothing against sitting down eating a heavy brick for the holidays. After all, it’s tradition!

    But it must be eaten in very small slices. And best consumed over the course of the several days surrounding the Mid-Autumn Moon Festival .

    Almost always heavy (thus my eating a brick reference), the ingredients comprising a moon cake varies from bakery-to-bakery, and from family-to-family. I’ve encountered numerous filling variations, involving bean pastes, ground seeds and nuts, salted egg yolk, dried fruits and shredded meats.

    Reade more

    Vietnamese conjugal cake

    The conjugal cake is normally served at Vietnamese weddings and used as a wedding invitation or taken by the man’s family to the woman’s family on engagement day.

    The stickiness of the cake is said to signify the stickiness of the marriage ties. Traditionally, a guy would offer these to the girl he wants to marry. Now these cakes are still an essential part of a wedding banquet, or the gift packages that the groom's family send over to the bride's.

    “Banh Phu The” is a Vietnamese sweet with a jelly-like texture made of tapioca flour, pandan, mung bean paste, sugar, sesame seeds and coconut milk. It is very unique with a leaf covering that looks like a tiny square box, made from coconut leaves. The reason it is called Banh “Phu The” is because of how it is wrapped: a box on the top fits perfectly with the box on the bottom.

    “Banh phu the” is more interesting in texture and flavor. In the real one, the cake has it green color and flavor by being steamed inside its box...
    Source: Hanoitimes


    Sunday, 17 September 2017

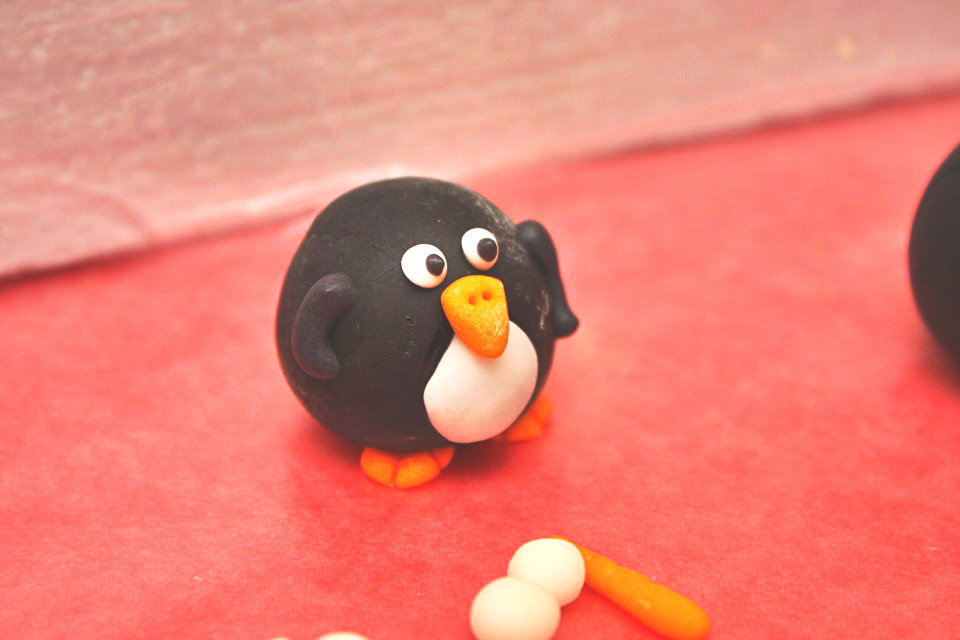
    Penguin Christmas: Completed


    Oh, what a fun cake! This is for my co-worker and his wife for their family Christmas. I'm glad it's done, though ... I've been working on it for a week. It turned out even cuter than I planned.


    Stats:
    8" round
    Duncan Hines Dark Chocolate Fudge cake mix
    iced and filled with semi-sweet + milk chocolate ganache
    covered in white MMF
    a border with royal icing
    fondant accents
    This was my first chance to work with Satin Ice (brand of manufactured fondant). I ordered red, green, and black 2 lb. tubs from www.fondantsource.com. The price, including shipping, was the cheapest I could find. It shipped quickly and arrived on my doorstep last Thursday. I was so excited I started making the bodies for the penguins right away.


    The entire body is fondant except for the eyes and arms. I was able to pipe on those using the royal icing I had made for decorating cookies. I made the creases for the toes with the edge of an old clay tool. The nostrils indentations were made with a toothpick. These little guys ring out with a personality that I didn't expect.


    I also started the Christmas trees early. The large Christmas tree got scrapped because I ended up making it look ugly and figured it was too heavy for the cake anyway.


    I used scissors to snipe the branches ... it looked much better when I watched Buddy do it on Cake Boss. Mine came out dry and rough looking. Oh well. I hope the decorations detract from that.


    The cake baked up so nice ... this is the highest rising cake mix I've ever used. I tried making ganache with 12 oz of semi-sweet morsels plus a handful of milk chocolate morsels. When it came to icing the cake, I could see that the milk chocolate morsels didn't get incorporated into the rest of the chocolate. They were still soft and spreadable, but it looked like light brown splotches all over the cake. I let it chill in the fridge overnight to set. When I rolled the fondant onto it, I noticed the ganache might have been too hard. I could smooth out a lot of the roughness. You can see it along the edges in the picture below.


    Otherwise, icing and covering the cake went really well. I'm really getting the hang of eye-balling how I need my stuff to be. I'm not even measuring the sugar when I make fondant or royal icing.


    Typical bead border on the bottom. But the fun part was the top. All my little guys first got skewered with a toothpick. This cake was making a 3-hour car drive, and I wanted to make sure there were no casualties. Each got secured with some royal icing. You can see it peaking out underneath them.


    My previous cake proved I could make an icy/drippy border, which was perfect! Again, using icing I had made for decorating my sugar cookies ...


    This whole cake came together really well, and I was super-pleased. It feels pretty good to be proud of a cake. Oh and this was cool: I was worried about the cake for the 3-hour drive. I put it in a cake box with the top cut off (because the Christmas trees were too tall). Then I put that box into this little wooden crate that I took from work. The building management for our office had brought us a gift basket full of candy, nuts, etc. They came in this simple wooden box/crate things. The 10" cake box fit inside it PERFECTLY. The cake was now snug, safe, and very portable. I only have one more crate left ... I wonder if I can order them ...

    FAILs:
    I need to figure out how to mix semi-sweet and milk chocolate for ganache
    set too hard ... or maybe that wouldn't have been a problem if I iced it smooth, to begin with
    you know what? Satin Ice doesn't taste awesome all by itself ... it tastes chemical ... I may have to try coloring my own MMF with Americolor gel paste to get a rich red, green, or black without sacrificing taste ... I hope no one eats a penguin

    FTWs: 
    figures turned out super cute
    Satin Ice fondant was very easy to work with
    I really love that drippy snow border!!!
    wooden crate held the cake box safe and snug
    Merry Christmas, Hang, and Sandi!
    Now for more pics!


    source here

    Tuesday, 12 September 2017

    That's really funny that some people didn't recognize it as cake


    My baby is finally 1 year old! She had a wonderful birthday party filled with family and friends. Her party theme was storybook fantasy (blame her mom for recently re-reading Lord of the Rings and watching Game of Thrones). I wanted her party cake to look like an old time of fairytales (a la Grimm brothers).

    Stats:

    • 9" x 6" pound cake iced and filled with Swiss meringue buttercream
    • 8" x 5" chocolate cake iced with chocolate cream cheese frosting
    • cake boards covered with fondant
    • color washed with brown airbrush coloring
    • painted with gold luster dust + Everclear


    Unfortunately, I didn't take any photos of the cake in progress (I had a lot to do!), but I can explain the process. I have Sharon Zambito's Book Smarts DVD (which I love) but didn't quite do that same process for this cake.


    The book covers were fondant covered cake boards (2 per book). I textured the fondant after covering the boards by crumpling up the foil, flattening it out, then pressing it against the fondant.


    The cakes were sitting on a cake board slightly smaller than the book covers. A strip of ivory fondant textured with an all-thread rod covered 3 sides of the cake.


    A strip of fondant for the spine was sandwiched between the cake and the covers. The brown fondant spine accidentally didn't cover all of the cake at one end but instead of re-doing it, I left it looking elder than originally intended! This is probably the first time my crummy fondant job actually worked in my favor!


    I diluted brown airbrush coloring with Everclear and "washed" the fondant to make them look dingy. The embellishments were gold luster dust mixed with Everclear painted on. Specifically for the text, I had printed out "Happy Birthday Ezri" with Ruritania font on a piece of paper. Then I free-handed painted the letters using the printout as a reference. That's why the spacing is inconsistent for the different words!

    The cake was put right in the middle of the serving table surrounded by food. Apparently, some people didn't realize what it was and were really confused why I (of all people) didn't have any cake!


    Source here

    The world's easiest layer cake


    So voila what I did to try to a small degree "style" !!!
    Hihi Hii !! however candidly. no panic it's hyper straightforward.
    Even as youngsters build this base of cake with their mistresses within the nursery !!!

    cap to create a cake terribly pretty and really superb ????
    For the cake, you would like ...
    1 dairy product or vanilla.
    3 pots of flour (or one.5 of flour and one.5 of maize no as here)
    2 pots of sugar
    3 whole eggs
    2 sachets of vanilla sugar (that you'll be able to realize here! thanks, Altereco !!)
    1/2 pot of oil (sunflower or oilseed ..)
    1 bag of leaven


    For garnish :
    400g of semi-sweet chocolate
    250g of sweet butter.
    80g powdered sugar

    Start by preheating your kitchen appliance to one hundred eighty ° C

    Mix your dairy product along with your eggs, then use the empty pot to live ...
    Add flour, sugar, vanilla sugar, oil, yeast, and starch
    the mixture to get a swish dough.

    Pour your mixture into a cake pan (preferably top!),
    buttered and floured.

    Bake for thirty to forty minutes reckoning on the scale and height of your mildew.
    To check the cookery, plant a skewer to skewer, it should start dry !!

    Remove the cake and let it cool dead ...

    When it's cold, cut the "slice in height",
    one or 2 thicknesses, in keeping with your style.
    I used an extended knife !!!


    Now occupy yourself with topping.
    Melt the chocolate on the one hand and therefore the butter on the opposite.
    Then mix these 2 ingredients, and so incorporate the powdered sugar.
    Let cool to a small degree, at a temperature in order that it hardens slightly.
    Finally compounding with the spatula to get a mix straightforward to unfold however not liquid ...

    Finally, covers of petite déco ... and happy birthday !!!!

    Friday, 1 September 2017

    a green tea with strawberry and rhubarb, frankly delicious!


    The first cheap strawberries are on the market, and I only think of one thing to strawberry, fast! And find greedy people to eat them !! This is my flagship cake, my favorite cake, I have made huge quantities of all shapes and ways! And here is the recipe!


    Recall of ingredients:
    5 eggs
    250g Butter
    470g Sugar
    500g strawberries (a little more is even better)
    125g Flour
    500g (ml) Milk
    50g Maïzena
    Vanilla


    Easy cake recipe:
    3 eggs
    100g caster sugar
    100g of flour

    1- Generously sprinkle a parchment paper (baking paper)
    2- Preheat the oven to 200 ° C (Th 6/7)
    3- Beat the white in snow at the robot (or at least with the electric mixer), and halfway pour the sugar and leave "meringuer"
    4- Once the mixture is thick, put the yolks and the flour and mix with the manual whisk gently
    5- Spread the dough on the sulphuret in thin layer (it will be necessary to cut 2 circles in it, or to cut it in 2 to make the 2 layers of strawberry cake)
    6- Cook 10-12 min in oven (top must be lightly browned but not too much and edges must not be burnt)

    Cream mousse (you can make a little more if you are greedy):
    1/2 liter of milk
    50g of Maïzena
    2 eggs
    250g butter at room temperature (released since the day before it is good)
    120g caster sugar
    vanilla extract or 1/2 vanilla pod or a whole clove

    If you have a Thermo mix, put everything in the Thermo mix except the butter that you leave at room temperature, and it is left for 7 min 30/100 ° / vit. 4. Go back to point 6-
    1- Mix eggs and sugar
    2- Add the Maïzena and mix
    3- Heat milk with vanilla
    4- Pour the milk over the mixture eggs/sugar / Maïzena and mix
    5- Return to the pan and cook by turning with the whisk without stopping until thickening and tasting to be sure that it does not have a mealy texture (it is not cooked in this case)
    6- Out of the fire, incorporate 100g of butter and incorporate it into the whisk
    7- Put to cool (you have to get an ambient temperature, you can go through the fridge but be careful that it does not become too cold)
    8- Put the cooled cream in the bowl of the robot, and put little pieces of the butter (the 2 must be at the same temperature for it to work, it is very important)

    If you have to do them by hand start by making a butter ointment and incorporate little by little the custard cream it will be simpler. Be careful not to be hot!

    MOUNTING
    1- Make a syrup at 30 ° B (188g of water 225g of sugar >>> boil 2 min and set aside)
    2- Flavor cold syrup with kirsch, rum, orange blossom (whatever you want)
    4- Wash and remove strawberries (about 500g or more!)
    5- Cut the strawberries in half in the direction of the height and circle around a circle to entremets (circle inox of 4cm high) points up.


    6- Place a disc of sponge cake at the bottom (cut it if necessary so that it comes in slightly forcing on the strawberries)
    7- Soak it with syrup without exaggeration, but all the same, we must put a lot
    8- Garnish with 1cm or 2 of cream
    9- Distribute the strawberries by planting them in the cream, you must put a lot!
    10- Cover with muslin cream (spread well between the strawberries)
    11- Place a disc of sponge cake and soak it in the circle once, you can put back a layer of cream if you have any left because it is nicer afterward with the almond paste!


    14- Spread almond paste (color of choice) to 2 / 3mm
    15- Place the almond paste on the Strawberry and cut off at the edge of the circle.
    16- Put in the refrigerator 4 to 6h (or prepare the day before it will be better!)


    Wednesday, 30 August 2017

    THE Royal Choco


    If there was a chocolate cake to remember among those of pastry it is this one. When cut it first meets the foam ... the dacquoise hazelnut, re-foam, CROSSING PRALINATED !!!, and finally dacquoise nutty.
    Balanced, light, delicious, it's one of my favorite cakes.
    Not so difficult to do, it is enough to know the technique that I will try to detail as precisely as possible! For my part, I missed the foam the first time but by viewing a very accessible video I understood my mistake and I never missed it! So do not hesitate to do so by following the advice I will give you and the tour will be played!
    Second strong point of this cake, one can easily make two and freeze the second for a future meal, it freezes very well, it is even a necessary step before the finishes!
    Ingredients for a circle of 20cm: (personally I always do double the quantities to freeze one, because the robot prefers the large quantities and that the work is spread for 2 cakes)

    Dacquoise:
    - 100g of egg white (3-4)
    - 30g of powdered sugar
    - 70g icing sugar
    - 60g of hazelnut powder
    - 15g of cornstarch or flour
    - a pinch of salt

    Crusty praline:
    - 35g of milk chocolate
    - 140g of praline (you can do it yourself but in this case, I advise you to do this before)
    - 60g of pancakes lace (glitter leaflet)

    Chocolate mousse :
    - 60g of yellows (4)
    - 30g of sugar
    - 25g of water
    - 100g of chocolate pastry minimum 55% (me I put off the 64)
    - 200g of liquid cream 30% minimum

    Realizing the Hazel dacquoise:
    Preheat your oven to 200-210 ° rotating heat.
    In a salad bowl put the egg white, the powdered sugar, and the salt and whisk until you get a very solid meringue.
    In a second bowl put the hazelnut powder, icing sugar and cornstarch and mix.
    Incorporate the meringue gently.

    Using a socket pocket, make a 20cm circle and a 18cm circle on parchment paper.

    Tip: Butter your circle 20cm (and a 18cm if you have one) and to make the biscuit in, it will avoid that it falls down.

    Bake 10-12 minutes at 200-210 ° turning heat, then place on rack. Be careful when you take off your biscuit not to break it.


    Without circle
    With circle, we see that it remains thick and fluffy

    Put a bowl in which you will mount the Chantilly and the whisks in the fridge (or better to freeze) time to make the sequel.

    Crusty praline:

    Put the milk chocolate to melt in the microwave (be careful not to cook it). Add praline and heat if necessary (if not liquid enough).
    Coarsely stir the lace crêpes in a bowl and then add them to the chocolate mixture praliné delicately.


    Unmould your dacquoise if necessary and prepare your circle for the assembly (if you have rhodoid for example)

    Spread the crisp on the 20cm dacquoise as long as it is warm.
    I use a tablespoon, really I did not find better to spread out, it's great!

    Chocolate mousse :

    This is the most delicate step because there is the bomb paste, the whipped cream, and the chocolate, but I will guide you !!

    Start by preparing your whipped cream. Remove the salad bowl from the fridge or frozen, put the cream in it, and whisk either with the robot (but beware of the small quantities) or with the electric mixer (attention splashes). When she is ready, she is said to be a bird's beak. When the beaters are removed, Chantilly hangs whips, like a beak. Reserve in the cool.
    Be careful, if you whip too much, the cream turns into butter and if it is not enough you will not have a foam. I do as for the whites in the snow if I'm not sure I lean the bowl to see if it slips or if it sticks to the bottom (if it's glued it's good!)

    Then melt the chocolate in the microwave. That is to say that you break it into small pieces then 1 min max power, you stir it a little, then in 30-second slices you check that it melts properly without baking by turning it until All is well melted.

    The bomb dough!
    Put the yolks in a salad bowl (or the robot bowl but watch out for small amounts) and prepare your drummer to go fast.
    Put the water and sugar in a saucepan over high heat, when it boils and the sugar is completely melted, pour over the yolks whipping, then continue to whisk until chilled. It will whiten, thicken, lather!
    In fact, it is said that whipping to the ribbon when you stop whipping, the dough must flow like a ribbon, it is sparkling and flowing.

    Now you have to incorporate the melted chocolate with the bomb paste, attention is the decisive moment when everything is played (big pressure !!!).
    With a spatula, drain all the chocolate into the bomb paste and mix thoroughly by remaining in the center of the bowl until you get a dinette-like or mont-blanc cream-like texture. Do not be delicate, do not do it with the whip anyway but it is essential that the mixture is done well otherwise the chocolate crystallizes and it is damn! When you feel that the mixture is working, you can calm the game and go more gently.

    Finally, carefully incorporate the whipped cream, there must be delicate, and well go back to the bottom to bomb paste. Is it a little liquid? It's not too serious.

    Mounting!

    Pour some foam on your crispy about 1cm thick, then put your dacquoise 18cm in the middle and cover with foam to the top of the circle.
    It is finished, now it leaves to the freezer for at least 2-4 hours before the finishes (or you decide that you have done enough, and you will sprinkle it with cocoa that is all! In this case no need to pass it To the freezer!

    For those who want to do the mirror frosting, it's here!

    Ingredients frosting mirror: (you will get for 2 cakes and it will inevitably because it necessarily takes more to coat a cake)

    - 80 g of water
    - 240 g of sugar
    - 80 g of cocoa powder (100% cocoa)
    - 160 g liquid cream
    - 5 sheets of gelatin

    Put the gelatin sheets in a cold water bath to soften them.
    Put the water and sugar to heat in a saucepan over high heat. Place the cocoa powder in a bowl.
    When the sugar has boiled and is completely melted, pour a good half on the cocoa and stir. Add the remaining syrup while trying to avoid as much as possible the lumps but it's not simple.
    Recycle your pan to heat the cream. When it no longer boils, squeeze the gelatine and put to melt in the cream by stirring to homogenize well.
    Pour the cream over the mixture cocoa mix, then filter all in a Chinese or colander to remove any lumps.

    Let cool, you can pour this mixture on your frozen cake when it will be at 30 ° to see 25 ° in no panic and no precipitation especially!


    The pictures speak for themselves, you put your cake on a rack with a plate underneath and you pour the frosting, then either with a bent spatula or shaking it a little, you remove the excess glaze.


    Finally the finishes, you can melt chocolate etc. whatever you want, the internet will be a source of inspiration for deco!

    The cake is eaten after 3-4 hours in the refrigerator, it will be perfect!


    Tuesday, 29 August 2017

    A recipe that combines fruits of passion, ginger


    Ingredients:

    Passion-ginger creamy cream

    100 g of passion fruit puree
    60 g caster sugar
    115 g of eggs (or 2 large eggs)
    80 g soft butter
    23 g fresh ginger
    1 sheet of gelatin


    Sand

    105 g soft butter
    40 g icing sugar
    1 g of salt flower
    95 g flour type 55


    Biscuit lemon olive

    55 g of eggs (1 large egg)
    90 g caster sugar
    Grated zest of 1 lemon
    45 g thick cream
    23 g of olive oil
    70 g flour type 45
    1 g of baking powder


    Yellow lemon punch

    50 g of water
    25 g caster sugar
    25 g lemon juice
    Grated zest of 1 half lemon


    Crispy hazelnut-puffed rice

    10 g of puffed rice
    15 g milk chocolate
    10 g house praliné
    10 g of hazelnuts


    For dressage

    1 tablespoon orange marmalade
    3 oranges
    rose petals
    A little-candied ginger


    Production:

    The day before

    Passion-ginger cream

    Put the gelatin sheet to soak in a bowl of cold water.
    (In the original recipe it is written that it takes 4 sheets of gelatin and I really think it's a mistake I tried and the cream was way too hard. good.)
    Peel the ginger and cut into very small pieces. Heat passion fruit puree with ginger in a saucepan until boiling. Let infuse 5 min.


    "Pass" the whole through the strainer, pressing the ginger so as not to lose juice.


    Mix the sugar and eggs and add them to the previous mixture.


    Cook all while boiling, whisking. Then add the drained gelatine out
    the fire. Mix to incorporate.


    Allow the mixture to cool to 40 ° C. And incorporate the soft butter by mixing the whole with a dipping mixer.

    Let cool, film on contact with food film and then place in cool for one night.

    The same day

    Sand


    Preheat your oven to 180 ° C. Mix the soft butter with the icing sugar, the salt flower, and the flour until a ball is obtained.

    Roll your dough between 2 sheets of baking paper, to get a little more than a 24 cm circle.

    Put everything in the fridge for a quarter of an hour.
    Then peel off your parchment paper. And use your circle as a cookie cutter.

    Remove excess dough and place on a baking sheet.

    Put it in the oven for 8 min. Remove the plate from the oven and set aside


    The lemon olive biscuit

    Lower the oven temperature to 170 ° C. Blanch the eggs, the semolina sugar and the grated lemon rind.

    Then add the thick crème fraîche, the olive oil and finally the flour and the sieved yeast.
    (Do not be afraid of olive oil, in the end, you do not feel the taste, but it gives a special texture to the mellow)

    Spread the mixture over the shortbread and cook for 15 minutes. Remove from the oven and slide on a rack to cool the biscuit.

    The lemon punch

    Boil the water with the semolina sugar, add the zest and the lemon juice, puncture the warm biscuit with a brush.

    Crispy hazelnut-puffed rice

    I will admit that here, I have a little simplified the original recipe, but like that, it works very well.
    Grill the hazelnuts in the oven for 10 minutes at 150 ° C.

    Melt the milk chocolate for 1 minute or 2 minutes in a microwave, add the praline then the crushed hazelnuts and the puffed rice.
    (Rice soufflé, I found it in the cereal department. Already chocolate or natural, both do the trick!)

    Let cool. Stir from time to time to make small heaps.

    Training

    Prepare supreme oranges. To do this, peel your oranges alive, that is to say, that by cutting them, it should no longer remain white skin. Then take your supreme by cutting between each orange membrane and place them on a strainer mixing with a tablespoon of orange marmalade. Allow the the excess juice to pass.


    Mix your passion-ginger smooth cream a little and place it in a socket pocket with a single round socket.


    Pocket the cream by making small pointed balls on the entire surface of your cake.


    Add the supremes that you cut in 2 then the crisp (do not put everything, it will leave you). Finally add the candied ginger cut into small cubes then some rose petals to make pretty ...


    Put in the fridge before tasting.


    And there, it is the feast to the taste buds!